The first thing the user needs to do is to start the applet.
You could also download the source code from our web-site and compile it yourself. At this point in the tutorial we will assume that you can access the applet and that you have started it.
Once the applet has loaded, you will see the following screen:

The screen has been partitioned into a Menu area, a Control panel, an Input Panel and an Output panel. The screen can be assumed to be partitioned into three rows. Row one has the Menu-Items, row two has the control panel and input panel, row three has the output panel. All the elements have been enclosed in a separate rectangular border for clarity.
The menu items are used to choose a domain for working, to add a pole/zero, to change the plots in the graph and to view the 3D response graph.
The control panel helps the user to enter the parameters for changing the various plots and also to change the frequency and bandwidth of a pole/zero.
The input and output panels display the location of the poles/zeros on the map and their frequency spectra
The first step in using this tool is to decide whether to work in the digital or the analog domain. By default, it has been set to work in the digital domain.To change the mode of operation,click on the Mode and choose between the Analog and the Digital option.
In this tutorial we will work exclusively with digital analysis, so change the mode to "Digital" now.
Now that we have decided which mode of operation to use, we are ready to start with the fun stuff.
Adding a pole or zero is easy. Simply decide what you want the effect of the pole/zero to be (in terms of center frequency and bandwidth). To change the frequency and bandwidth,click on the Parameters and choose the Input option. This will effect a change in the Control panel and have it display the Input Parameters. Then change the value of Frequency and Bandwidth text-fields. To determine whether it should be a pole or zero, click on the Edit menu and choose the Add Pole or the Add Zero option. Let's try this:
Set Frequency to 0.0 and Bandwidth to 0.07 by typing the respective numbers in each entry field. Click on the "Edit" menu button and then choose the "Add Pole" button. If you did this correctly, your screen should look like this...

Changing the Sampling Frequency or the DC Gain is also simple. Just choose the Input option in the Parameters menu and change the corresponding text-field entries and press the 'Enter' key on the keyboard.
Notice that adding this pole has changed virtually every section of the applet. The pole now shows up as a boxed X on the pole/zero map (a zero would show up as a boxed O), the coordinates for the pole are now displayed in the "Poles" list box, and all three output windows are now showing time and frequency responses of the system described by the single pole.
Let's practice by adding a few more poles and zeros. You can place them wherever you like
There are two ways to remove the poles and zeros from the system:
-
You can remove a single pole/zero by clicking on it
within the pole/zero map and pressing the button 'd'.
Try this now with one of the poles or zeros you just created
-
The second way to remove poles and zeros is to clear the
map using the Clear option in the Go menu. This
removes all poles and zeros from the system.
You can try this now, too.
There are a few operations available with this applet for manipulating the poles and zeros of the system. The first of which is the use of the mouse to move the pole or zero in the Pole/Zero Map. This is done by clicking on a pole or zero in the Pole/Zero Map and holding the mouse button down while you drag it to another location in the map.
Create a pole at frequency = 0 and bandwidth = 0.07 with a sample frequency of 1.0. Click on the "X" in the Pole/Zero map denoting this pole. While holding down the mouse button, drag the mouse to a different location in the map. Notice that one or more of the output windows change as you move the mouse. Now release the mouse button and you will see that the output windows now reflect the response of a system to the new pole location.
In place of the mouse, one could also use keystrokes to move the poles or zeros. This is done by first clicking on the pole or zero you desire to move and then using the "i", "j", "k" and "l" keys for movement up, left, down, and right respectively.
Try this!
One of the more important features of the pole zero map is the ability to create conjugate pairs and to treat them as a singular object. To create a conjugate pair you must first create a single pole or zero. Next, click on that pole or zero in the Pole/Zero Map and press the "c" key. You can then move the pair around just as you would a singular pole or zero.
First clear the map(you know how to do this). Now create a pole at frequency = 0.12 and bandwidth = 0.07. Now click on that pole and hit the "c" key. You should now have two poles, one at frequency = 0.12, bandwidth = 0.07, and one at frequency = -0.12, bandwidth = 0.07. Try dragging one of them with the mouse and see that the other "follows".

There are (4) response types which are available with this applet They are: Impulse response, Magnitude response, Phase response, and 3-Dimensional Magnitude response. The Impulse, Magnitude and Phase response windows are located at the bottom of the applet screen from left-to-right respectively. The 3-D response window is separate from the applet main window and can be accessed from the choosing the Frequency Response option in the Go menu. What follows will show how to use the various output windows.
-
Impulse, Magnitude, and Phase Responses
The Impulse response is a function of time and indicates the output of a system when stimulated with a unit impulse at the input.

The Magnitude and Phase response together, comprise the frequency response of the system. The Magnitude response is in units of dB while the phase response is in units of radians.


The Impulse, Magnitude, and Phase Response all use the same GUI component to display the waveforms and thus can use all of the same operations. For our purposes, we will concentrate on the Magnitude response.
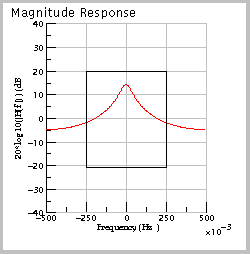
To learn the different utilities available with the output response windows begin by creating a simple single-pole system with frequency = 0 and bandwidth = 0.07 and a sample frequency of 1.0. The magnitude response will be displayed as shown below.

To zoom in on a portion of the output window right click and drag the mouse to create a rectangle around the portion of the plot you wish to view. When the appropriate area is selected, release the mouse.
Try this by selecting the middle portion of the Magnitude response window. Notice that the window rescales to fit the portion of the response selected.
An alternative to using the mouse for zooming is to manually set the zoom limits. This is done by choosing Magnitude option from Parameters menu. The entries in the control panel change and now correspond to the frequency and magnitude limits of the magnitude plot.
Try this by choosing the "Magnitude" option in Parameters menu. Note that the entries in the Control panel changes and now correspond to Magnitude response entries.
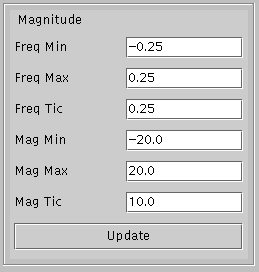
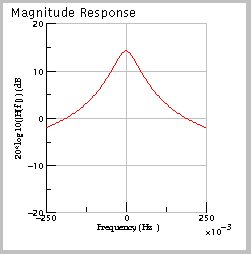
Enter Freq Min = -0.25, Freq Max = 0.25, Freq Tic = 0.25, Mag Min = -20.0, Mag Max = 20.0 and Mag Tic = 10.0 and click on the "Update" button.
The plot will rescale itself to look like this:
To get back the original response window, click on the pole/zero in the pole-zero map or change the Magnitude parameters in the control panel.
-
3-D Magnitude Response
The 3-D response is one of the more important parts of this applet because poles and zeros are one of the more difficult concepts to visualize. To access the 3-D response window choose Frequency Response option in Go menu. The window shown below will appear.

Before we get into the depth of 3D graph add a pole to the system.
Frequency = 1000.0 Bandwidth = 1000.0 Sampling Frequency = 10000.0 (You know how to change the input parameters)
At this point, the 3-D Magnitude response has not been calculated. The 3-D Response window is a "calculate-on-demand" utility. Since calculation of the 3-D response is long and time-consuming, it would be undesirable to constantly update it as we do with the other output windows. In addition, it gives the user a chance to set the calculation options, such as plot limits, before calculations begin. To begin calculation of the 3-D response, press the "calculate" button in the upper-right hand corner of the 3-D Response window. After a few moments, the response shown below will appear.
Press the "calculate" button now and see if your window matches the one shown below."

There are a number of options available with the 3-D Response window which give the user free-reign to explore. First is the ability to set the resolution of the plot. This is done by setting the values under the "Divisions" heading. "Calculate" and "Display" values determine the resolution of the calculations and display respectively. The resolution of the display can never be larger than the resolution of the calculations, but the opposite is not true. The utility of these options will become clear shortly.
In addition, one can set the limits of the plots using the "Minimums" and "Maximums" entries. It is typically a good idea to keep the maximum and minimum entries symmetric about zero, but it is not a necessity.
As an example: change the x and y minimums to -25000 and change the x and y maximums to 25000. Press the "Calculate" button. The frequency response seems to have cloned itself - remember the Sampling Theorem. Note also that the poles do not seem as large now. This is a problem with the resolution of the plot. Try changing the "Calculate" and "Display" divisions to 200 and pressing the "Calculate" button again. This will take quite a bit longer but will give a better view of the surface.

Also, there are toggle buttons in the bottom-right of the window which allow one to change the look of the plot axes and grids.
Another nice feature of the 3-D window is the ability to change the viewpoint of the plot. To do so, click on the plot and drag the mouse in any direction. The plot will rotate to the viewpoint you specified. However, if you try this at high resolution display values, it will be very slow. This is the reason for the resolution options under the "Divisions" heading. It is wise to reduce the "Display" entry to a very low number and rotate to the desired viewpoint and then reset the "Display" entry to the previous value. Remember to hit the "Calculate" button after changing the entry value.
Try this now: Change the "Display" entry to 10. Hit "Calculate". Now click and drag the surface plot in any direction. Notice that the viewpoint changes as you do so. Release the mouse and change the "Display" entry back to its previous value. Hit "Calculate" and you will see the same plot you had earlier but at a different viewpoint.
To close the 3-D window, you can either minimize through the normal method for your Operating System or you can click on the "Stop" button in the 3D applet screen.
This is the end of the tutorial. Enjoy the learning experience